

This year, to go with our comfortable Christmas theme, I decided to keep our tree simple and straight forward-- including making a Scandinavian paper star for our tree topper.

They are very easy to make -- I whipped up the topper in ten minutes flat. You'll need some paper-- cardstock works best to hold the shape for the tree topper, though you could do a smaller ones out of regular paper for ornaments. For the purposes of this tutorial, I used patterned paper. You'll also need scissors and glue or double stick tape.

Glue two strips of paper into a plus sign-- you can fold each strip in half to find the center point. Do the same with two more strips.


.jpeg)
I love the burlap garland with the white lights-- there is something so...cozy about it.
.jpeg)
We are settling in for a wonderful holiday break-- the semester is over and its time to enjoy the season. Cookies and a few more crafts and a lot more pictures to share-- hope your holiday is off to a great start!


Lay a strip of paper on either sided of the center strip, like so:
Glue these strips to the horizontal piece of paper. Now weave another strip of paper (over-under-over) above the horizontal strip, and again below the horizontal strip and glue wherever two strips of paper cross over.
Repeat this for the other plus sign.
Turn your woven strips over.
Take two of the outer strips and bend them toward each other and glue. Repeat this on all four sides. leaving the original plus sign strips flat.
Repeat for the other set of woven strips.
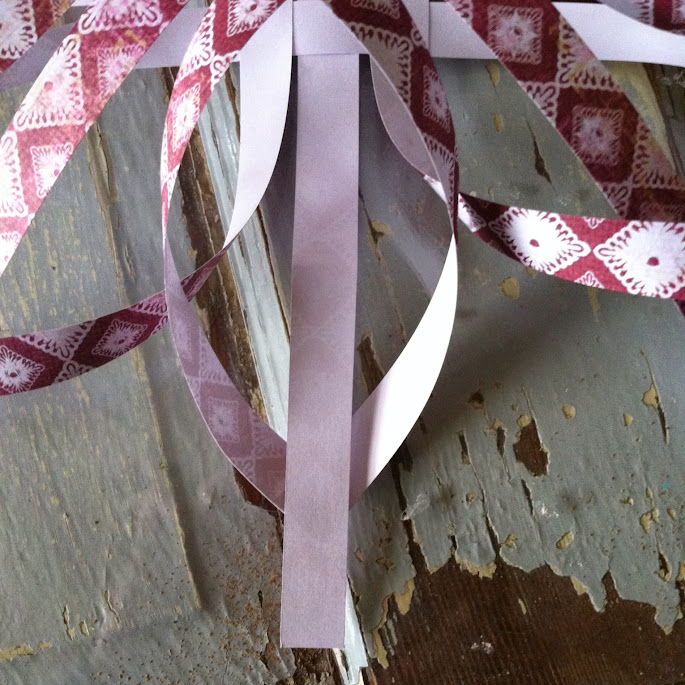
Take one of the sides of the star and lay it on top of the other, blank sides of paper facing each other. Turn the top side of the star so that each of the points of the star are above one of the flat strips of paper.
Bring the flat strip of paper through the points and glue. Repeat for all the strips and points.
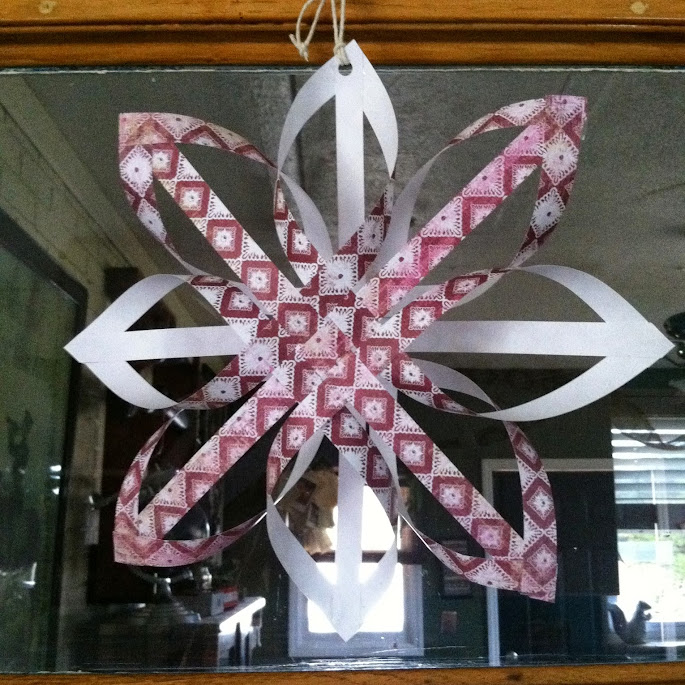
Some folks leave the star as is at this point, but I prefer to trim off the strips of paper to make a finer point.
To us it as a tree topper, simply slide the top of the tree through the star. To hang the star, punch a hole through one of the points and loop through some string.
Told you it was easy!
I love how the tree came out-- paper snowflakes, a few sparkles, and a lot of laser cut wood pieces that I spray painted varying shades of white. I love the burlap garland with the white lights-- there is something so...cozy about it.
We are settling in for a wonderful holiday break-- the semester is over and its time to enjoy the season. Cookies and a few more crafts and a lot more pictures to share-- hope your holiday is off to a great start!
Yay Scandinavian Star!
ReplyDeleteYay Scandinavian ancestry!!
DeleteLovely !
ReplyDeleteAnna
Thanks! And super quick & easy too!
DeleteGreat tutorial! Your tree looks lovely. So glad that you joined us at the Make it Monday Party! Hope to see you again next week.
ReplyDeleteI should be, if I get my camera back lol
DeleteYou're the best! This is so pretty. I should make some of these with the kids over the holidays!
ReplyDelete